Full lips
Both lips show a substantial area of visible lip color relative to the mouth's width. The upper and lower lips can still differ in height.
Not sure what kind of lips you have? Compare lip types, see the features in your photo, and find makeup tips for the look you want.
Start with a relaxed, front-facing photo. Explore visible thickness, upper-to-lower balance, Cupid's bow and relative width.
Upload a relaxed, front-facing photo, or try an example below.
Look at a few features together. You can check them in a mirror or use the lip analyzer above to see the proportions in a photo.
1.Start with the natural outline
Remove lipstick and lip liner, face the mirror straight on, and let your lips meet gently. Relax your jaw and mouth corners.
2.Compare the visible upper and lower lips
Look at the colored lip area, also called the vermilion. Notice how much height you see in each lip and whether one looks fuller than the other.
3.Check the width, center and corners
Notice how far the mouth extends across your face, whether the upper lip has two clear peaks, and where the relaxed corners sit relative to the center. Use the chart below for the overall outline.
4.Put the features into one description
Try a description such as lower lip fuller, clear Cupid's bow, relatively wide mouth. Keep each feature that fits; a single type name may leave out part of what you see.
These lip types describe different parts of the outline. A full lower lip and a clear Cupid's bow can appear together, so compare each feature separately.
Both lips show a substantial area of visible lip color relative to the mouth's width. The upper and lower lips can still differ in height.
Both lips show a smaller area of visible lip color relative to their width. A defined Cupid's bow can still be present.
The mouth extends farther across the face. Check width in relation to your face; the same outline may also look thin or full.
The overall outline looks compact and rounded, with less contrast between width and height. The central upper edge may look softly curved.
The center looks prominent, the sides taper toward the corners, and a clear upper-lip dip helps create a heart-like overall outline.
Two distinct upper-lip peaks and a central dip create a bow-like edge. This describes the upper outline; the lower lip can have a range of shapes.
The upper lip appears taller or fuller than the lower lip. Compare both lips while relaxed, and check the center as well as the sides.
The lower lip appears taller or fuller than the upper lip. You may also see this called heavy lower lips or a fuller lower lip.
Both relaxed corners sit lower than the central mouth line. Check a neutral expression, since smiling or pursing changes their position.
The drawings are simplified guides. Compare round, heart-shaped and downturned outlines by eye; the photo tool reports measured thickness, balance, bow depth and width.
Cupid's bow is the double curve at the center of your upper lip. A heart-shaped description includes that curve plus the overall fullness and taper of the mouth.
For a heart-shaped outline, compare the prominent center and the narrowing sides. The lower lip also contributes to the overall shape.
For a bow-shaped upper lip, focus on the two peaks and the valley between them. You can have this feature with a thin, full, wide or lower-heavy outline.
Lip type names vary between charts. Here, the tool's bow measurement describes the depth of the central dip; compare the whole outline yourself before choosing a heart-shaped label.
Choose the effect you want before choosing a lip liner technique. Start by following your natural outline, then try a small change at the center if you want more definition, softness or fullness.
Solid outline: natural lip edge. Dashed gold line: where to try the liner.
Follow the natural lip-color edge. Mark the two upper peaks and the lower center lightly, then connect them to each corner with short strokes. Fill inside that outline with lipstick.
If you want a sharper bow, mark the central dip and the two upper peaks with lip liner. Connect those points back into the natural edge on each side. This is one option for softly rounded upper lips.
Try a rounded connection across the central V, then return to the natural edge on both sides. A softer liner edge can make a defined bow or heart-shaped outline look less angular.
Try a small amount of overlining at the upper and lower center, returning to the natural edge toward the corners. A little gloss at the center adds reflected light. Keep the first outline subtle so you can judge it from the front.
On the lip you want to emphasize, try a small central overline; follow the natural edge on the fuller-looking lip. The drawing shows a lower-lip adjustment. Reverse the choice if you want to emphasize the upper lip.
Stay along the natural edge and try a matte lipstick texture or a softly blended liner. Compared with central gloss, a matte finish reflects less light and can make the outline look more restrained.
The diagrams illustrate common liner techniques. Try a light outline first and compare it from the front. The tutorials below explain these makeup options.
If you see two borders, try lining the inner color edge toward the corners and the raised outer edge at the center. Join the two paths gradually. This is an optional outline to compare with following the color border throughout.
Dark line: color border. Pale line: raised edge. Dashed gold: suggested liner.
The analyzer compares visible distances in your photo. It uses the lip-color height at the center, mouth width, a face-width reference and the upper peaks around Cupid's bow.
(Upper height + lower height) ÷ lip width × 100
This compares the central height of the colored lips with their width. An open-mouth gap is excluded. The value describes visible height in this photo; the sides of the lips may look different.
Upper height ÷ lower height
A value above 1 means the central upper lip is taller; below 1 means the central lower lip is taller. Compare the marked center with the rest of the outline when choosing a type name.
Central dip below the two peaks ÷ lip width × 100
This describes how far the center sits below the two upper peaks in the photo. The marked peaks and valley help you compare that local feature with the chart.
Lip width ÷ face width × 100
This puts the mouth's width in relation to the face-width reference in the same photo. Head angle and perspective affect the comparison, so use a similar camera position for repeat photos.
Type labels use this tool's classification rules. Near a boundary, compare neighboring outlines and retake a relaxed photo; a small change can move a reading across the line.
Central visible height below 10% of lip width is labeled thin; above 20% is labeled full. A band of 1.5 percentage points around each boundary shows neighboring features.
An upper-to-lower ratio above 1.4 is labeled upper-heavy; below 0.6 is labeled lower-heavy. A band of 0.07 around each boundary keeps neighboring descriptions visible.
These cutoffs are labeling conventions adapted from a public lip-type classifier. They describe central visible height, and are separate from population averages or beauty standards. Width and bow depth remain measured features; the chart supplies the overall outline comparison.
View the public classification rules used as a starting pointFace the camera straight on
Keep the camera at face height and your head level. Step back enough to include the whole face, then crop if needed. A close, angled selfie changes relative widths.
Let your lips meet gently
Relax your jaw, avoid smiling or pursing, and keep your teeth out of view. If the result asks for a closed-mouth photo, retake it before comparing lip types.
Show the natural lip edge
Use even natural light and remove lipstick, liner and strong gloss. Skip filters that reshape the mouth or blur its boundary.
Repeat the same setup
Compare photos with the same expression, camera height and distance. Check the example above to see how a smile changes the outline on one face.
Expression changes the outline you see. Compare this face with relaxed lips and a smile, then use the same relaxed expression when comparing your own photos.
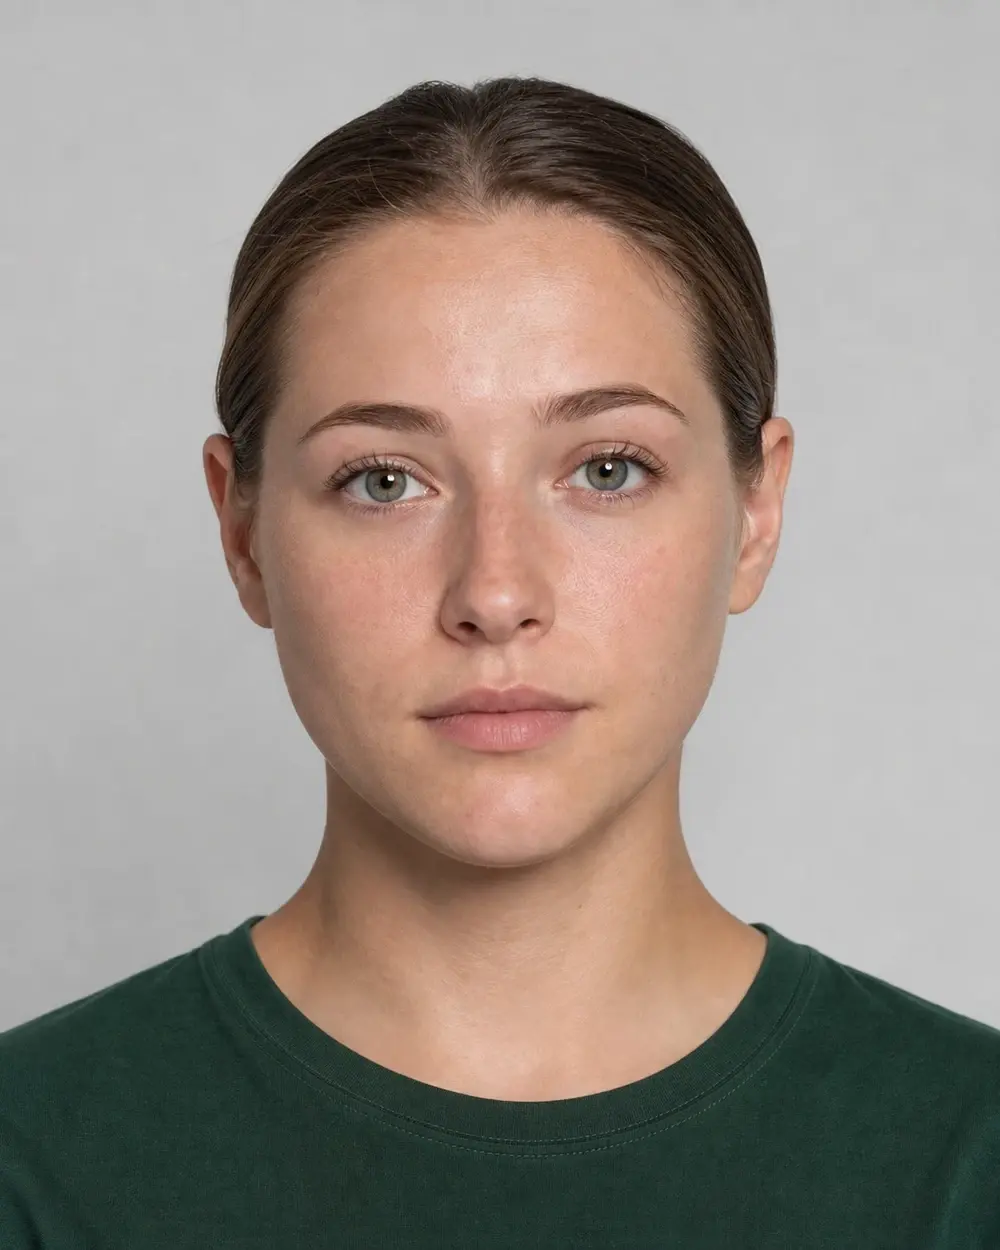
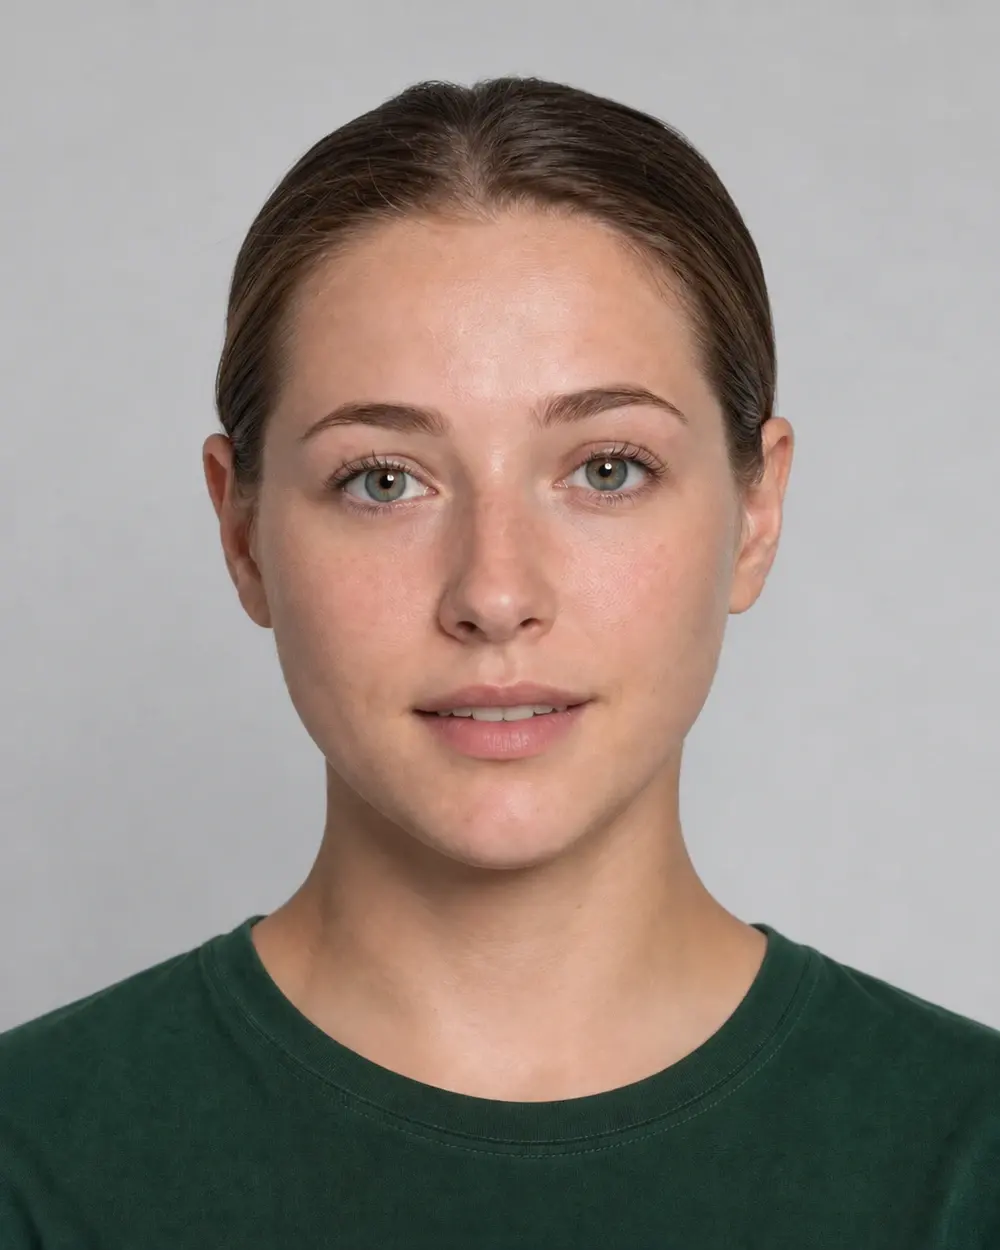
A smile stretches the corners and changes the visible lip height. These photos show one example; your own change will depend on your expression and camera position.
Compare the two sides in a relaxed, level photo. Look at the corners, the upper peaks and the visible lip edge before deciding where a liner adjustment would help.
A smile, turned head or camera tilt can make one side look taller. For makeup, mark both sides lightly, check the outline from the front, then build the color in small steps. For a broader photo-based comparison, explore the face symmetry tool.
Compare the two halves of your faceThe guides below support the lip-type descriptions and liner techniques used on this page.
Start with relaxed lips, check the marked measurements, then choose a liner technique for the effect you want.
Find My Lip Shape